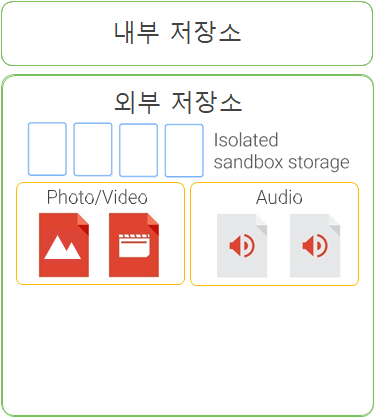
Android Q OS 이전에는 아래와 같은 형태로 Storage가 관리되었다.

내부 저장소
개별 앱만 접근 가능
외부 저장소
외부 저장소 권한이 있으면 누구나 접근이 가능
- READ_EXTERNAL_STORAGE
- WRITE_EXTERNAL_STORAGE
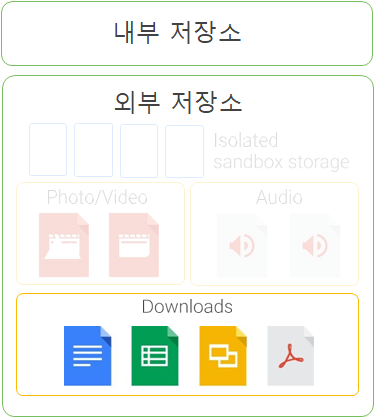
하지만 Q OS 이후에는 Storage 관리가 아래와 같이 변경되었다.

샌드박스 저장공간
- 개별 앱만 접근 가능
- 읽고 쓰기 위한 별도의 권한 필요 없음
- Context.getExternalFilesDir(...)
- 앱 삭제 시 함께 삭제됨
- 앨범 아트, 썸네일 등 다른 앱과 공유할 필요가 없는 미디어 파일은 샌드박스 공간을 활용

공용 저장공간
- MediaStore.Audio
- MediaStore.Video
- MediaStore.Images
- 별도 권한 없이 파일 생성 가능
- 외부 저장소 권한으로 다른 앱이 생성한 파일 접근 가능

다운로드 저장공간
- MediaStore.Downloads
- 별도 권한 없이 파일 생성 가능
- 시스템 파일 선택기를 통해서만 다른 앱이 생성한 파일 접근 가능
Scoped mode
원활한 Migration을 위해 Scoped mode 적용 여부를 선택할 수 있는 플래그를 Manifest.xml파일에서 아래와 같이 제공하고 있다.
<application android:requestLegacyExternalStorage="true">
다음 Android 버전(Android 11 / R)에서는 Target SDK 버전과 관계없이 모든 앱에 Scoped mode를 적용될 예정이다.
단, 개발 앱의 Scoped mode 여부는 앱 설치 시 정해지며, 이후 변경되지 않는다.
다음 코드는 Android Q 이전에서 이미지 파일을 저장하는 예제다.
private void beforeQ() {
    String strFolderPath = Environment.getExternalStorageDirectory().getAbsolutePath() + CAPTURE_PATH;
    File folder = new File(strFolderPath);
    if (!folder.exists()) {
        folder.mkdirs();
    }

    OutputStream out = null;
    String strFilePath = strFolderPath + "/";

    try {
        File fileCacheItem = new File(strFilePath + fileName);
        fileCacheItem.createNewFile();
        out = new FileOutputStream(fileCacheItem);
        // 비트맵을 png로 변환
        bmp.compress(Bitmap.CompressFormat.PNG, 100, out);
        // 미디어 스캐닝을 하여 삭제,추가 정보를 알린다.
        sendBroadcast(new Intent(Intent.ACTION_MEDIA_SCANNER_SCAN_FILE, Uri.fromFile(fileCacheItem)));
    } catch (Exception e) {
        e.printStackTrace();
    } finally {
        try {
            if (out != null) {
                out.close();
            }
        } catch (IOException e) {
            e.printStackTrace();
        }
    }
}
다음 코드는 Android Q 이후에서 이미지 파일을 저장하는 예제다.
private void afterQ() {
      ContentValues values = new ContentValues();
      values.put(MediaStore.Images.Media.DISPLAY_NAME, fileName);
      values.put(MediaStore.Images.Media.MIME_TYPE, "image/*");
      // 파일을 write중이라면 다른곳에서 데이터요구를 무시하겠다는 의미입니다.
      values.put(MediaStore.Images.Media.IS_PENDING, 1);

      ContentResolver contentResolver = getContentResolver();
      Uri collection = MediaStore.Images.Media.getContentUri(MediaStore.VOLUME_EXTERNAL_PRIMARY);
      // ContentResolver을 통해 insert를 해주고 해당 insert가 되는 위치의 Uri를 리턴받는다.
      // 이후로는 해당 Uri를 통해 파일 관리를 해줄 수 있다.
      Uri item = contentResolver.insert(collection, values);

      try {
          // Uri(item)의 위치에 파일을 생성해준다.
          ParcelFileDescriptor pdf = contentResolver.openFileDescriptor(item, "w", null);
          if (pdf == null) {

          } else {
              InputStream inputStream = getImageInputStram();
              byte[] strToByte = getBytes(inputStream);
              FileOutputStream fos = new FileOutputStream(pdf.getFileDescriptor());
              fos.write(strToByte);
              fos.close();
              inputStream.close();
              pdf.close();
              contentResolver.update(item, values, null, null);
          }
      } catch (FileNotFoundException e) {
          e.printStackTrace();
      } catch (IOException e) {
          e.printStackTrace();
      }
      values.clear();
      // 파일을 모두 write하고 다른곳에서 사용할 수 있도록 0으로 업데이트를 해줍니다.
      values.put(MediaStore.Images.Media.IS_PENDING, 0);
      contentResolver.update(item, values, null, null);
  }
private InputStream getImageInputStram() {
ByteArrayOutputStream bytes = new ByteArrayOutputStream();
bmp.compress(Bitmap.CompressFormat.PNG, 100, bytes);
byte[] bitmapData = bytes.toByteArray();
ByteArrayInputStream bs = new ByteArrayInputStream(bitmapData);
return bs;
}
public byte[] getBytes(InputStream inputStream) throws IOException {
ByteArrayOutputStream byteBuffer = new ByteArrayOutputStream();
int bufferSize = 1024;
byte[] buffer = new byte[bufferSize];
int len = 0;
while ((len = inputStream.read(buffer)) != -1) {
byteBuffer.write(buffer, 0, len);
}
return byteBuffer.toByteArray();
}
출처
'Basic > Android' 카테고리의 다른 글
| [Android] Intent를 이용하여 Uri 얻어내기 (0) | 2020.05.29 |
|---|---|
| [Android] Scoped storage를 이용하여 txt 파일을 읽어오는 방법 (0) | 2020.05.21 |
| [Android] build gradle Product flavor 설정 방법 (0) | 2020.04.15 |
| [Android] 화면 회전 고정 시키기 (0) | 2020.03.23 |
| ValueAnimator을 이용한 애니메이션 만들기 (0) | 2020.03.21 |